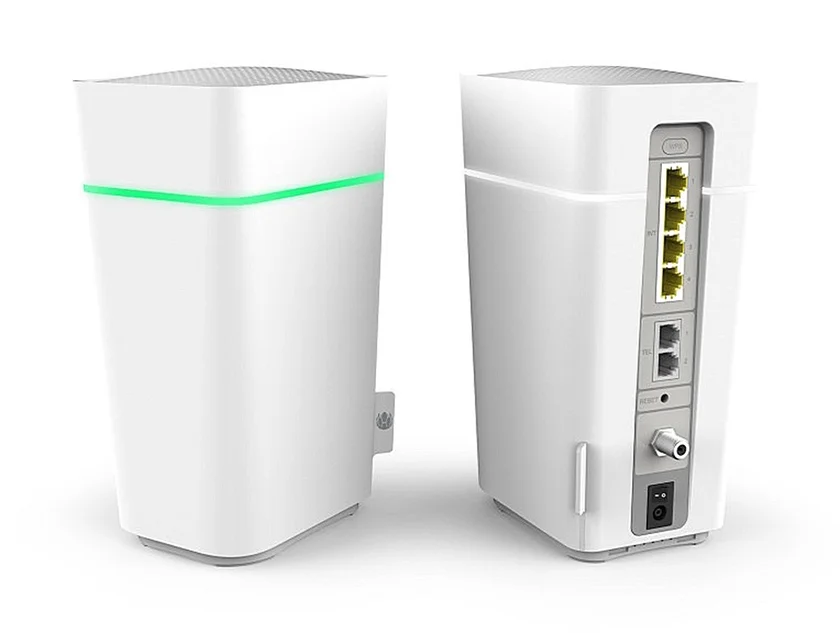
Throughout the World we’re starting to see slightly greater than Gbit internet speeds provided by DOCSIS 3.1 become mainstream, however in a few countries, you are only able to use the modems provided by your cable provider, in a lot of cases limiting the speed you can obtain on a single device in your LAN. This is the case in the United Kingdom with Virgin Media, a provider of Liberty Global. A provider of which allows the use of a 3rd party modem in other European nations (take Germany with Unity Media), despite it being a clear technical possibility as proven elsewhere, Virgin continues to refuse. The main limitation of this device is the Gbit LAN interfaces, which will limit your downloads to about 940 Mbps after ethernet frame overhead.
This blog intends to help you get greater than Gbit speeds on your Virgin Media Gig1 connection by exposing a network interface that’s capable of 2.5 GbE, 5 GbE, and 10 GbE adaptors.
Many different DOCSIS 3.1 modems exist with 2.5 GbE network interfaces, my first instinct was naturally to try to find one of these modems and determine if there’s any technical way to get them on to the Virgin network. In Germany, you must provide two IDs to your provider to enable these devices to be used, this suggests that if you could somehow spoof the addresses of the Virgin Superhubs, you’d be able to do the same thing. Despite searching, I had no luck and found no evidence of anyone being able to do this.
It may seem illogical to have a 1.15 Gbps connection limited to GbE switch ports, however financially it makes more sense and it’s very difficult to encounter greater than GbE interfaces on consumer devices. With Virgin only guaranteeing 570 Mbps, they do not even need to try to deliver close to 1.15 Gbps to single devices, 570 Mbps can easily be obtained (and even routed) over Gbit ethernet. There’s no reason for them to cater to the people who don’t want to waste that extra couple hundred megabits (an amount that’s equal to multiple times the national average internet speed).
ISP-provided routers are ultimately made up of a computer doing the routing, a network switch, wireless chipset and aerials, and the modem to connect you to their network. All of this needs to be achieved at a price that makes sense when you roll out the equipment to millions of people. The inevitable result is that you end up with some really poor quality hardware.
Recently, Virgin has finished 2.2 Gbps testing. At this speed, it’s far more compelling to have greater than Gbit ethernet on at least a single switch port. When your connection is this fast, you can no longer use the argument that it “prevents buffering”, an argument which has been used to sell faster packages for many years. These speeds are only ever going to be useful when you want things fast (a 100 GB game for instance). For this reason alone, Gbit ethernet is not sufficient, despite Virgin running their tests on the same, limited hardware. Along with this, their speed guarantee will exceed the speed of a single ethernet port, if they apply their same ratios.
I think you get the point here, I could rant for a while about the hardware provided.
My goal (with the help of internet strangers especially this forum thread) has been to expose a greater than Gbit LAN interface from a router. A process that has been achieved and I want to walk you guys through. After putting some thought into this, the cost of the hardware required to do this would not be that much greater than if you were to have an ISP provided router in “modem only mode”, with your 3rd party router with greater than Gbit interfaces. The additional greater-than-Gbit LAN equipment may add up though, but this is unavoidable. The router is not a costly component of your network.
I’ll explain some costs further on.
The Equipment
As mentioned before, we are going to require some additional hardware. For this setup I have entirely split out the routing from LAN traffic, therefore only a single interface is used on the router to connect a switch.
Which hardware you pick on the LAN side of your network is up to you, I will give a few ideas but this is really on you.
How?
Before we continue, let’s explain what’s going to happen.
After a fair amount of searching, it seems that the Virgin Media Superhub does
play nice with the Linux bonding driver in balance-rr mode.
It has been difficult to find much information about this, however searching
through the sources used to build the OS that runs on the Superhub, you can
find the Linux bonding drivers.
It’s almost certainly the case that a bonded interface is created in modem
mode.
A normal user wouldn’t notice this as a bonded interface with only one active
link on balance-rr is identical to having no bond interface at all.
This would also explain why only one interface can be used in modem mode and
why the router doesn’t play nice if you attach a switch in modem mode.
If anyone from Liberty Global, Virgin Media or Arris could confirm this, I’d be interested to hear.
Unlike other bonding methods, balance-rr will juggle ethernet frames over all
interfaces in the bond.
The first frame to the first interface, second to the second, and so on,
repeating itself.
This has several advantages, such as load balancing, the ability for an
interface to fail without interruption, but the feature we want is the ability
to fully saturate all the interfaces’ bandwidth.
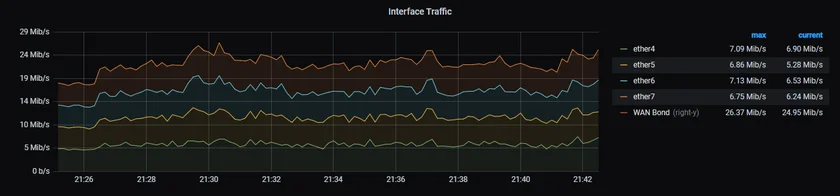
It’s worth noting that not all ethernet frames are created equally and this does mean that some interfaces will deal with more traffic than others. However, at the rate you will be sending data, this will pretty evenly distribute itself. It’ll almost appear like all interfaces consume the same amount of data. By using as many interfaces to this bond as possible, we also improve the chances of equal balancing. Here are some metrics to illustrate that:
This does mean that a single stream can saturate all interfaces (although it’s unlikely you will find many greater-than-Gbit download rates coming from a single stream).
The last thing to mention here is that this bonding also functions in modem mode. This means that everything mentioned does not have limitations of double NAT.
The Router
The router we will use is an RB4011iGS+RM from MikroTik. This is an affordable router that has 10 x GbE interfaces and a single 10 G SFP+ interface.
Any router with balance-rr bonding support will suffice, providing the
combined bandwidth of the interfaces is greater than that which you plan to
route.
We will configure the SFP+ interface to be our LAN interface, along with 6 of the GbE interfaces (which we will not use, I’ll explain why to avoid using them later on), and 4 of the GbE interfaces will connect to the Superhub to become our WAN interface (ether4/5/6/7).
I chose this router because we do not need to worry about buying a bunch of SFP modules to connect the Superhub, the power is more than sufficient, it’s silent, and it’s very affordable at only about 140 GBP.
On the limitations side, each group of 5 GbE interfaces only has a 2.5 Gbit link to the CPU. This will not be a problem for our setup because we will only attach 2 GbE interfaces to each group, maxing the number of usable ports on the Superhub.

LAN Equipment
On my LAN, I have purchased 2 Zyxel XGS1010-12s. This is an affordable switch that provides 2x SFP+ interfaces, 2x 2.5 GbE interfaces, and 8 GbE interfaces. On my network, this works well as I do not have many devices (yet) that can go beyond 2.5 GbE.
One thing I have yet to explain (which is not common in consumer networking) is “SFP”. This is a standard of hot-swappable network interfaces effectively, with SFP+ interfaces being able to give up to 10 Gbit. This means along with 2 capable devices, you will need something to attach to these SFP interfaces.
To connect the router to the switch, I recommend you look into SFP+ DACs. These “direct attach copper” are a cost-effective way of connecting two SFP+ devices by eliminating the need to buy a couple of SFP+ modules.
My router is connected to a switch with an SFP+ DAC. The two switches are connected using a copper SFP+ module which allows for 10 GbE over CAT7.
For some people, this may not be sufficient as the number of 10 GbE interfaces is limited. In that scenario I recommend you look into a MikroTik CRS305-1G-4S+IN. A simple network switch that provides 4 SFP+ interfaces.
Due to the 2.5 Gbit limit from each group of 5 GbE interfaces, we should not use them for LAN traffic. Any local traffic going over this interface will start to saturate these limited links, there are only negatives in doing so. It’s recommended that instead, you have every LAN interface on the SFP+ interface. If you purchase the MikroTik SFP+ switch above, you should buy a cheap GbE switch to attach to the GbE interface for local traffic, such as a TP-Link TL-SG108S, but which specific Gbit switch doesn’t matter. If you went for the Zyxel option, then this is probably less of a requirement, however, chaining switches is still the right thing to do. In summary, avoid using the GbE interfaces on the router for LAN traffic.
The only component that we’re likely missing now for domestic networks is your wireless. Each person will have different requirements here, be that speed, size of the house, or budget. Therefore I will not put forward any wireless access point recommendations, just keep in mind this is something you will also need to account for.
The Setup
Now everything’s explained, there’s not a whole lot to the setup.
Connect your new router to your PC with ethernet interface 10.
You’re then going to need to set your computer’s IP to 192.168.88.2 (/24).
Now it’s possible to navigate to the RouterOS Web Interface.
Then we want to paste a script into the terminal there which does all of the following:
- Create a bridge of the SFP+ port, plus
ether1,2,3,8,9,10. - Creates a bond from interfaces 4 to 7 using
balance-rr. - Adds the bond to the WAN interface group, and the bridge to the LAN group. This is used for identifying which interfaces to NAT.
- Creates a DHCP pool (
192.168.0.0/24). - Configures DHCP client on the bond and server on the LAN bridge.
- Sets up firewall rules from NAT (these are MikroTik’s defaults).
- Enables SNMP (I use this for metrics as you can see in my chart above).
- Enables admin control on the LAN interface group.
The Configuration File
/interface bridge
add name="LAN Bridge"

/interface ethernet
set [ find default-name=sfp-sfpplus1 ] auto-negotiation=no name="SFP LAN"

/interface bonding
add name="WAN Bond" slaves=ether4,ether5,ether6,ether7

/interface ethernet switch port
set 0 default-vlan-id=0
set 1 default-vlan-id=0
set 2 default-vlan-id=0
set 3 default-vlan-id=0
set 4 default-vlan-id=0
set 5 default-vlan-id=0
set 6 default-vlan-id=0
set 7 default-vlan-id=0
set 8 default-vlan-id=0
set 9 default-vlan-id=0
set 10 default-vlan-id=0
set 11 default-vlan-id=0

/interface list
add comment=defconf name=WAN
add comment=defconf name=LAN

/ip pool
add name=dhcp_pool1 ranges=192.168.1.100-192.168.1.200

/ip dhcp-server
add address-pool=dhcp_pool1 disabled=no interface="LAN Bridge" lease-time=23h59m59s name="LAN DHCP"

/tool user-manager customer
set admin access=own-routers,own-users,own-profiles,own-limits,config-payment-gw

/interface bridge port
add bridge="LAN Bridge" interface=ether1
add bridge="LAN Bridge" interface=ether2
add bridge="LAN Bridge" interface=ether3
add bridge="LAN Bridge" interface=ether8
add bridge="LAN Bridge" interface=ether9
add bridge="LAN Bridge" interface=ether10
add bridge="LAN Bridge" interface="SFP LAN"

/ip neighbor discovery-settings
set discover-interface-list=LAN

/interface list member
add interface="WAN Bond" list=WAN
add interface="LAN Bridge" list=LAN

/ip address
add address=192.168.1.1/24 interface="LAN Bridge" network=192.168.1.0

/ip dhcp-client
add disabled=no interface="WAN Bond"

/ip dhcp-server network
add address=192.168.1.0/24 dns-server=8.8.8.8,8.8.4.4 gateway=192.168.1.1

/ip dns
set allow-remote-requests=yes

/ip dns static
add address=192.168.88.1 comment=defconf name=router.lan

/ip firewall filter
add action=accept chain=input comment="defconf: accept established,related,untracked" connection-state=established,related,untracked
add action=drop chain=input comment="defconf: drop invalid" connection-state=invalid
add action=accept chain=input comment="defconf: accept ICMP" protocol=icmp
add action=accept chain=input comment="defconf: accept to local loopback (for CAPsMAN)" dst-address=127.0.0.1
add action=drop chain=input comment="defconf: drop all not coming from LAN" in-interface-list=!LAN
add action=accept chain=forward comment="defconf: accept in ipsec policy" ipsec-policy=in,ipsec
add action=accept chain=forward comment="defconf: accept out ipsec policy" ipsec-policy=out,ipsec
add action=fasttrack-connection chain=forward comment="defconf: fasttrack" connection-state=established,related
add action=accept chain=forward comment="defconf: accept established,related, untracked" connection-state=established,related,untracked
add action=drop chain=forward comment="defconf: drop invalid" connection-state=invalid
add action=drop chain=forward comment="defconf: drop all from WAN not DSTNATed" connection-nat-state=!dstnat connection-state=new in-interface-list=WAN

/ip firewall nat
add action=masquerade chain=srcnat comment="defconf: masquerade" ipsec-policy=out,none out-interface-list=WAN

/ip ipsec policy
add dst-address=0.0.0.0/0 src-address=0.0.0.0/0 template=yes

/snmp
set enabled=yes

/system clock
set time-zone-name=Europe/London

/tool mac-server
set allowed-interface-list=LAN

/tool mac-server mac-winbox
set allowed-interface-list=LAN

/tool user-manager database
set db-path=user-manager
Next, you will need to put your Superhub into Modem mode and attach cables from it to port 4, 5, 6, and 7 on the MikroTik router.
Restart everything and you’re done. The Superhub doesn’t like it when you move between devices when in modem mode, so a power restart of the superhub is necessary.
Attach your LAN devices to the SFP+ cage and your new router is configured.
This provides an absolute bare minimum configuration for your router. You can apply whatever you want in addition to this, such as static DHCP leases, admin passwords, or more complex setups like VPN clients.
Alternative Bridge Implementation
Since writing this post, I have been thinking about and questioned about how
else you may be able to achieve this setup, ways that may prevent you from
replacing your potentially already very good hardware.
Users may already have 10 Gbps capable routers, one of which being the Dream
Machine Pro.
This router (along with a majority of routers on the market) does not support
the bonding configuration options that we need, however with the addition of a
switch/router which does support balance-rr, you are able to create a bridge
between the bond and a 10 Gbps interface without adding any routing overhead.
If you already have a 10 Gbps router which you would like to keep that does not support the bonding mode we require, this approach is for you.
MikroTik’s SwOS doesn’t support anything other than the LACP, so if you want to go the MikroTik route, ensure you obtain hardware with the more complete RouterOS.
This setup is known to work with the router we used before, as well as the CRS305-1G-4S+IN switch.
The router will be the more cost effective option as SFP modules are not required and it provides more power. The switch may be a better option however for use in the future as these 10 Gbit interfaces will remain relevant for a long time, this may end up more costly than the router option since SFP modules will be required.
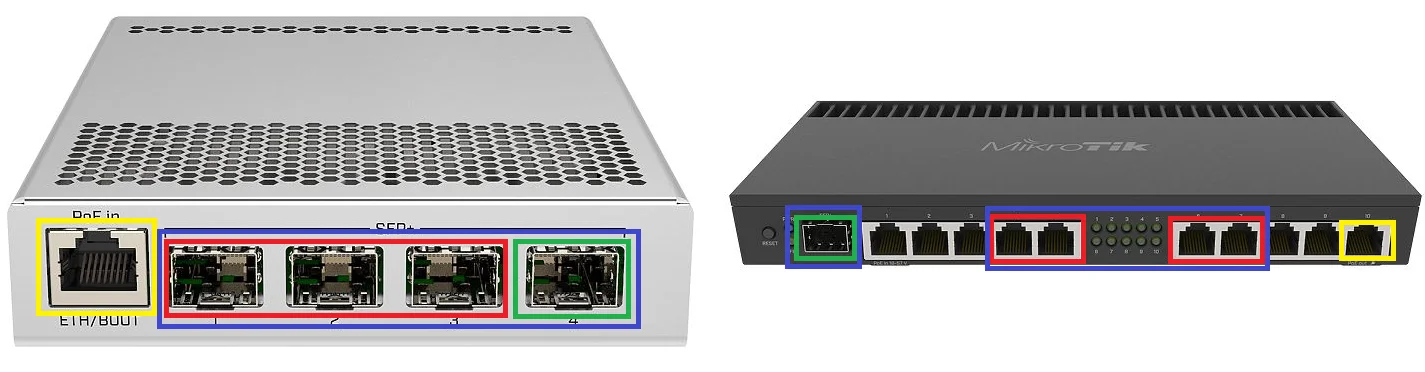
In the illustrations above, we have 4 distinct properties.
- The yellow interface should have DHCP enabled. It should connect to a switch on your LAN so you can access management.
- Red interfaces should have 1G SFP modules, each connected to the Superhub.
These interfaces form a
balance-rrbond. - The green interface should be a 10G SFP+ DAC (or some other 10G modules) running to the 10 Gbit capable router.
- Blue represents the bond group with default options except that ARP should be disabled. This is to prevent the switch from being addressed by the Superhub or your own router.
Except for yellow, no interface should have an IP address or DHCP assigned. There should be no other bridges except from blue.
As with the router setup described in this post, only two links between the bridge and the switch/router are absolutely necessary.
Final Notes
This can be quite costly if you begin to kit out your entire home network with 10 Gbit capable hardware, but in most cases, you will probably only need 10 Gbps to limited devices.
I know I didn’t mention much about the home setup, this is because every case will be different. If you have any specific questions or want tips for your setup, please feel free to ask in the comments, I am sure I or someone else can give you pointers.
I also recommend you check out Craft Computing’s video on affordable 10 Gbit home networking. The equipment demonstrated is absolutely compatible with our new setup. It may be a tad pricier this side of the pond but it’s still the most cost effective equipment you’ll encounter.
Lastly, it’s worth noting this setup is entirely compatible with the Superhub 3 too. If you plan to get your network 10 Gbit capable before Gig1 is in your area, this is entirely possible and the new Superhub will be a drop-in replacement in the future.
I am pretty happy with the outcome of this blog, however, the application of the initial configuration is a bit messy (pasting into a terminal). If anyone has any recommendations on how to apply this more neatly, please reach out!
For a lot of people, this is obviously not a great solution as it can be a bit excessive, I accept that.
Since we know balance-rr works on the Superhub, we know this method will work on any Linux based router which exposes bonding options, such as dd-wrt.
As of right now, there don’t appear to be any supported dd-wrt supported routers with a 2.5GbE port, however I am keeping my eyes on the RT-AX86U.
A solution which uses this router with flashed firmware will likely be more accessible.